


3.3.3 Mapping and Localization Tutorial
Course subject(s)
Module 3. Autonomous Navigation
The first thing presented to you is a video tutorial. The intent of this video is to give you a short illustration of what you should get when following the mapping assignments. After the video tutorial you will be presented with the written mapping tutorial. You can follow the tutorial step-by-step and complete it. At last there will be a tutorial about localization.
Mapping Tutorial
In this tutorial you will be guided to map the TurtleBot_world using gmapping. First of all, we have to start our Gazebo simulation.
$ roslaunch turtlebot_gazebo turtlebot_world.launch
Next, open up a second CCS. It may require a bit of patience for Gazebo to start. In the second CCS we will view the active ROS nodes.
$ rosnode list
Look if there is a node with slam or gmapping in its name. You should not see those in the list of nodes. Next, we will open up the gmapping_demo launch file. Remember that gmapping is a specific SLAM implementation.
$ roslaunch turtlebot_gazebo gmapping_demo.launch
After that, open up a third CCS and check the active ROS nodes again. You should see the /slam_gmapping node is now active. Let’s look at the topics this node is publishing and subscribing to.
$ rosnode info /slam_gmapping
Under subscription we can see /scan, through which the this nodes receive the information gathered by the laser scanner. We also see this node is publishing to the map topic of the environment as expected.
To visualize the mapping process, let’s open up RViz. We can open up a ‘blank’ RViz window and add our robot model and further settings. However, it’s easier to load up a configuration. Run the following command in a third CCS.
$ roslaunch turtlebot_rviz_launchers view_navigation.launch
To make everything clearer, you will need to change some settings.
- Set LaserScan/size(m) to 0.06
- Set LaserScan/style to ‘flat squares’
- Set Localmap/Costmap/Topic to /map
- Set Globalmap/Costmap/Topic to /map
Right now, we are ready to go. If we now move the robot around the environment, the mapping process should start. To do so, we can use teleoperation. Run this in a fourth CCS.
$ roslaunch turtlebot_teleop keyboard_teleop.launch
Press the z key few times to slow the robot down. Because we are creating a map with a metric representation, it will be sensitive to noise. To ensure the quality of the map, move around slowly and try to keep an object in sight at all time.
After moving around for a while you will have created a great map. This map will be very useful when we want to navigate the world. However, we need to save it somewhere. In a fifth CCS run the following command.
$ rosrun map_server map_saver -f ~/<choose a directory>/test_map
Notice the we named our map test_map. If you browse to the directory specified in the previous command we will find 2 files:
- test_map.pgm
- test_map.yaml
Open the First file. You can see that this file contains a picture of the environment similar to this one.
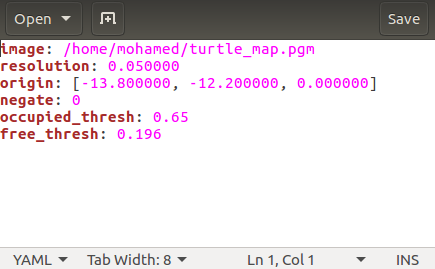
Next, open the first file. You will see that it points to the .pgm file, and contains further information about the resolution, origin, etc. It should look similar to the following figure.
Localization Tutorial
So, we have seen how to create a map of the environment. Now we will load our map and try to get the TurtleBot to localize itself properly.
First of all, let’s open the TurtleBot in Gazebo. In the first CCS enter:
$ roslaunch turtlebot_gazebo turtlebot_world.launch
Right now, we will need to open up the nodes responsible for localization. In the second CCS execute:
$ roslaunch turtlebot_gazebo amcl_demo.launch map_file:=~/<directory of map>
Note that the map file used should the yaml file. So the previous command should end with something like map_file:=$HOME/test_map.yaml, if you saved the map file in your home folder.
The amcl stands for Adaptive Monte Carlo Localization. This is a probabilistic localization system for a robot moving in 2D which uses a particle filter to track the pose of a robot against a known map. The known map in this case is the one we just created.
Finally in a third CCS we will open up RViz to visualize the navigation.
$ roslaunch turtlebot_rviz_launchers view_navigation.launch
Right now we are ready to go. Remember from the lecture, we can have an absolute position on the map if we use a global method of localization. However, with local method localization can be obtained only by moving the robot around first and taking more measurements. The robot will start of somewhere random on the map view in RViz with something similar to the following.
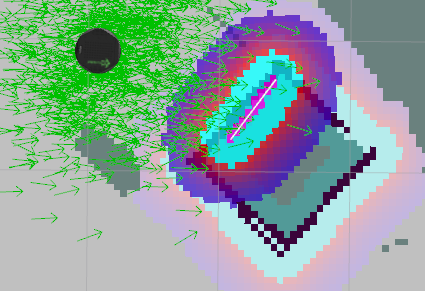
Let’s break this picture down. The round black circle is the TurtleBot. It’s surrounded by green arrows which are probabilistic estimates of its actual position. Pretty much like the blue squares you saw in the lecture slides.

Then you see the edges from the square as in our original map. One of its edges is purple with (and a thin white line form the laser scan is on it). This is one of ‘measurements’ the robot has take to localize itself. So now we have to move the robot and let it take more measurements to improve localization.
Run this in a fourth CCS to teleoperate the robot.
$ roslaunch turtlebot_teleop keyboard_teleop.launch
Now move the robot around and observe the green arrows around it. Since we get more certainty about where the robot is, the arrows should come close and closer indicating more a more accurate probabilistic model. It should be similar to the following:
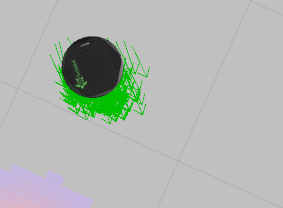
The position of the robot should also be positioned correctly on the map. Take a look at Gazebo to see whether that’s true.
This can be done easier if you could just give the TurtleBot a hint of where it’s. RViz provides us with a tool to do so. The 2D Pose estimate.

Just for fun: try to give the robot false hints and see how it reacts. After that, move it around and give it more hints.

Hello (Real) World with ROS - Robot Operating System by TU Delft OpenCourseWare is licensed under a Creative Commons Attribution-NonCommercial-ShareAlike 4.0 International License.
Based on a work at https://online-learning.tudelft.nl/courses/hello-real-world-with-ros-robot-operating-systems//.